Tips & Tricks — API 500 Series EQ Collection
Ask platinum-selling recording engineers about their favorite EQs for tracking and mixing, and they’re certain to recommend the 500 Series from Automated Processes, Inc. In the late 1960s, audio pioneer Saul Walker combined his custom 2520 discrete Class A/B operational amplifier with his Proportional Q circuit, resulting in a pair of equalizers that have graced thousands of hit records over the course of more than four decades.
The API 550A and 560 are now standard equipment in top recording facilities, humble project studios, and everything in between. Lucky for us, these classic EQs have been meticulously modeled for the API 500 Series EQ Plug-In Collection.
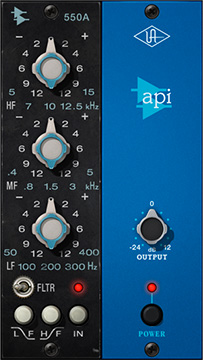
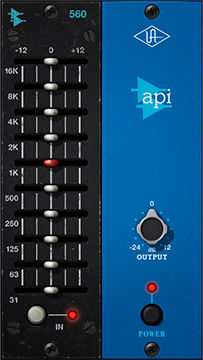
The 550A is a parametric equalizer with three overlapping bands. Each band provides five fixed frequencies you can boost or cut as much as 12dB. The 560 is a 10-band graphic equalizer, also with up to 12dB of boost or cut on each band. Universal Audio’s circuit modeling faithfully reproduces the filter shapes, op-amp clipping, and interactions between bands that have always made the API 550A and 560 such in-demand studio processors.
Each plug-in comes with a useful selection of artist presets designed by top recording engineers whose credits range from U2 and Paul McCartney to Dwight Yoakam and the Kronos Quartet. You can access their custom setups by clicking on the plug-in’s preset menu in your host application. Once they’re loaded, you can modify the presets as you wish and save your changes.

include six knobs for band
adjustments, low and high band
shelving buttons, a bandpass
filter switch, and an output
level adjustment
API 550A Controls
Each of the three bands are concentrically arranged with a pair of knobs, with one knob atop another. The gray knob on the outside has 11 positions for selecting the band’s gain, and the blue-green knob on the inside has five positions for selecting the band’s center frequency. Because the low-frequency (LF), mid-frequency (MF), and high-frequency (HF) bands overlap at 400Hz and 5kHz, the 550A gives you a total of 13 frequencies you can boost or cut.
The quickest way to select a center frequency for any of the 550A’s three bands is to click directly on the frequency value. If you want the low frequency band to affect 200Hz, for example, just click on the 200 label.
You can individually select whether the low and high frequency bands are peaking or shelving filters. Engaging the LF Shelf button will turn on shelving for the low band. Likewise, engaging the HF Shelf button will turn on shelving for the high band. When shelving is disengaged, both bands are in peaking mode.
The switch labeled FLTR enables a bandpass filter that suppresses frequencies below 50Hz and above 15kHz. Flipping it to the right engages it, resulting in a subtly rounder sound. Engaging the EQ In switch enables the three band filters as well as the bandpass filter; when it’s turned off, all filters are bypassed. Use the Output knob to increase or decrease the processor’s total gain.
API 560 Controls
Each of the ten sliders on the 560 EQ controls the gain for a single frequency band. Center frequencies range from 31Hz to 16kHz. Moving a slider to the left from its center position cuts that frequency’s gain by as much as 12dB and moving to the right boosts it by the same amount. Clicking on a band’s frequency label will reset its gain to zero, and clicking on the 0 near the top will set the gain of all bands to zero.

gain of all ten frequency bands.
The 560’s Output knob and EQ In button operate exactly as they do on the 550A. Each plug-in models the original hardware’s circuitry to subtly color the sound, even when you bypass equalization by turning off the EQ In.
Using the Proportional Q
Both the 550A and 560 processors take full advantage of Proportional Q, so that increasing or decreasing a band’s gain narrows its frequency range; the greater the boost or cut, the narrower the Q. To boost a particular frequency with greater precision, crank it up. Likewise, you can notch out a particular frequency by cutting the gain by an extreme amount.
A good way to familiarize yourself with the effects of Proportional Q is to process a track containing nothing but white noise. Loop the track, if necessary, and drag the 550A knobs and the 560 sliders around to sweep through the various bands and get a feel for how the controls affect spectrum. At any frequency, especially if it’s higher than 100Hz, you’ll actually hear the band narrow as you increase the gain. And when you lower the gain, you’ll hear the notch grow steeper.
It’s a bit grating on the ears, but you can easily hear what Proportional Q is doing in this sound example:
Using the 500 Series for Drums
Many recordists rely on the 550A and 560 to tame drum tracks. Especially popular is using the 550A to fatten up the snare’s low end and dial up the high-end clarity and crack. To emphasize the sound of the snare’s shell, I like to boost the 200Hz peak by 4dB on the low band. Then, bring out the crack of the snare by boosting the mid band by 6dB or more at 1.5kHz. You can usually improve clarity by boosting the high end by 4dB at 10kHz. To prevent unwanted clipping, use the Output knob to back off slightly on the overall gain.
Here’s a sound example of a snare drum before being treated with the 550A:
And after:
The 560 is useful for beefing up a kick drum’s thump and minimizing any papery qualities it might have. In this example, I moved the 31 and 64Hz sliders up about 4dB, moved the 2kHz slider up about half that much, and then rolled all the other bands down about 2 dB. Exactly which settings you find most useful will depend on kick’s original sound, of course.
Here is the kick without the 560:
And here it is with the 560 settings:
Using 550A for Guitar
Most engineers agree that the 550A is especially good on guitar tracks, either electric or acoustic. One of my favorite settings uses a +2dB bump at 200Hz to round out the body, another +2dB bump at 5kHz to liven up the midrange, and a +4dB boost at 10kHz to open up the air. This combination almost always sounds good, and it will help the guitar stand out in the mix, too.
Take a listen to this guitar example (especially the midrange) before the API 550A plug-in:
And after:
Make Bass Guitars Growl
The 550A can also emphasize the midrange growl in a bass guitar and help it sit better in the mix. Engineer Vance Powell (who has worked with the likes of Jack White, Martina McBride, and Willie Nelson) likes to set the middle band to boost the signal at .8kHz and then crank up the gain all the way to +12dB. Depending on the sound you want, you might also want to cut the lows a bit to reduce boominess or cut the highs to reduce tininess.
There’s quite a remarkable difference. Here’s the bass before the 550A:
And after:
Learning to use the 550A and 560 effectively offers many advantages, whether you’re laying down tracks or trying to nail a mix. Spend some time getting to know both EQs, and you’ll see why they’re so popular among recording pros.
— Geary Yelton
Weiter
Butch Walker Records Green Day with Apollo & UAD
Producer Butch Walker (Weezer, Taylor Swift) details how he used Apollo, UAD, and OX Amp Top Box to help deliver one of Green Day's most ambitious records yet.
The Human Element
Learn how SOHN (aka TophTaylor), uses UAD plug-ins and his Apollo x8p interface for his ultra-textured laptop symphonies and how he learned to embrace the human element in his recordings.
Nailing the Tone for Post Malone
Learn how multi-platinum producer Louis Bell uses his Apollo Twin and UAD plug-ins to record and mix vocals for artists such as Post Malone, Camila Cabello, and DJ Snake.


